

Crafting a Custom Cribbage Board on Your CNC: Complete Step-by-Step Manual
Welcome to this comprehensive guide for milling a "Fourth and Goal" cribbage board on your CNC router. This manual is based on my workflow for the Onefinity Journeyman CNC paired with a Makita RT0701C Compact Router, using hard maple stock. The design features 400 precisely drilled peg holes, detailed pocketed laces and stripes, V-Carved football markers, and a clean profile cutout.
Note: These instructions are for the single cribbage board layout. If you purchase digital plans, you will get the single (15" x 7.25") and triple (45" x 7.25") board layouts. These instructions for the single board apply to the triple board, as well. The triple board just combines three boards so you can reduce the bit swaps and increase your production.
Whether you're a seasoned CNC hobbyist or just getting started, follow these detailed steps for professional results. All toolpaths are pre-designed in Vectric VCarve Pro (finished cribbage boards or digital files available for purchase). Total CNC time: ~75 minutes. Sanding and finishing: ~30 minutes plus drying time.
Prerequisites
- CNC Specs: Optimized for Onefinity Journeyman (see full specs for your machine comparison).
- Bits Needed: 1/8" drill bit, 1/4" end mill, 1/8" end mill, 60° x 3/8" V-bit.
- Software: The latest Vectric Aspire/VCarve Pro (version 12.507 at the time of this writing on 02/16/2026).
- Safety: Wear eye/ear protection. Secure all bits properly. Vacuum dust frequently.
General Setup (Steps 1–3)
1. All measurements are from the top surface of the board.
Use the same reference spot on the board for every Z-depth bit setting throughout the job. I recommend a spot on the outer waste area (e.g., 0.5" from the edge) so it's never machined away by a toolpath. This ensures consistent depths across all operations.
2. Toolpath naming convention.
I use a consistent system for easy organization in your toolpath list:
a. First word(s): Cut type (e.g., Drill, Pocket, V-Carve).
b. Middle word(s): Purpose (e.g., Pegs, Rough Football, Finish Cribbage).
c. Last word(s): Bit details (e.g., EM 0p25 for 0.25" end mill; V60 0p38 for 60° V-bit at 0.375" diameter).
Example: Pocket Rough Football EM 0p25.
3. Speeds and feeds.
All parameters are tuned for a mid-grade hobby CNC (Onefinity Journeyman) routing hard maple with the Makita RT0701C. For your setup:
- Compare machine specs at the link above.
- Increase feeds 10–20% for softer woods; decrease 15–25% for denser stock or less rigid machines.
- Always test on scrap first.
Board Preparation and Mounting (Steps 4–5)
4. Select and prepare your stock.
Choose a premium hardwood like maple, cherry, or walnut. Dimensions: 15" L x 7.25" W x 0.75" thick.
a. Flatten the board to exactly 0.75" using a planer or CNC surfacing pass if needed.
b. In your Job Setup panel, confirm the material height matches (see Figure 1). Different thickness? Update it here to avoid depth errors.
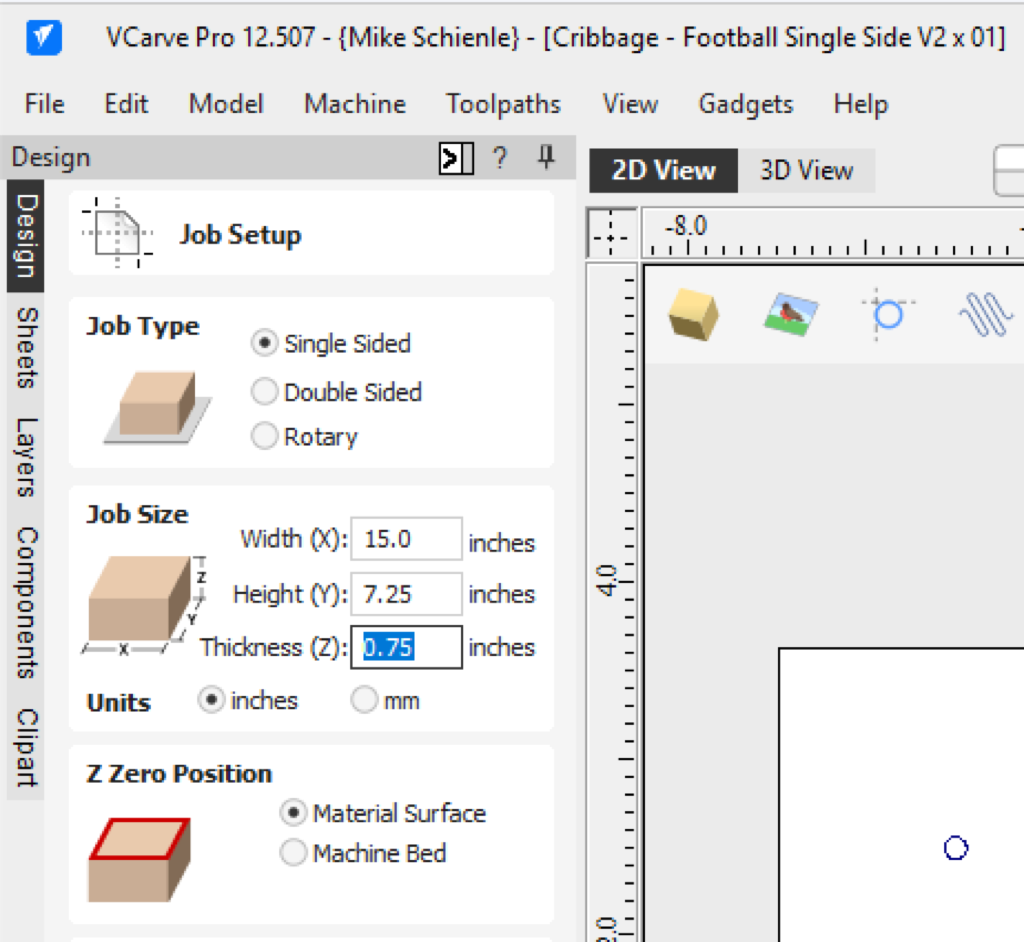
Figure 1: Job Setup panel showing board dimensions
5. Mount the board securely.
Attach to your wasteboard using screws, double-sided tape, clamps, or wedges. I combine #8 wood screws (in pre-drilled holes) with double-sided carpet tape (or painter's tape + CA glue) for zero-shift hold-down - no tabs needed on the profile.
Pro tip: The "chicken and egg" of hold-downs is real. Pre-drill screw holes before full mounting.
a. Toolpath: Drill Mount Holes EM 0p13
- 1/8" CNC drill bit, 1.25" depth, 4–6 holes around perimeter. Time: ~2 minutes. Mounting holes completed.
Peg Hole Drilling (Step 6)
6. Drill the 400 peg holes.
If not used for the mounting holes, switch to a dedicated 1/8" CNC drill bit (not a standard end mill). This allows a single-pass plunge to full depth (0.665") without deflection (see Figure 2).
a. Toolpath: Drill Pegs EM 0p13
- 1/8" CNC drill bit, 400 holes in a standard cribbage layout.
- If using end mill: Enable peck drilling (0.125–0.25" per peck) to full depth.
b. Run at 16,000 RPM, 200 IPM feed, 100 IPM plunge (50 IPM plunge if pecking with end mill).
Time: ~10 minutes for CNC drill bit (60+ minutes for end mill). Peg holes completed.
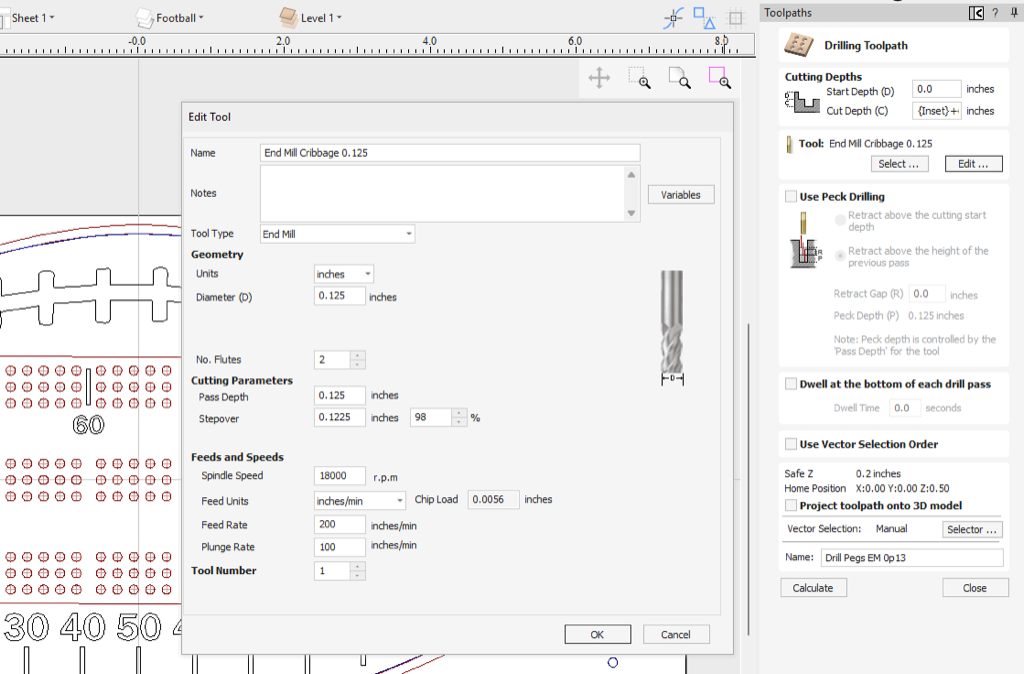
Figure 2: Drill 400 Peg Holes
Rough Pocketing with 1/4" End Mill (Step 7)
7. Switch to 1/4" end mill and reset Z once.
All four toolpaths below use this bit—combine into a single G-code file for efficiency (see Figures 3 and 4).
a. Toolpath: Pocket Laces EM 0p25 – Shallow decorative inlays.
b. Toolpath: Pocket Stripes EM 0p25 – Score track outlines.
c. Toolpath: Pocket Rough Football EM 0p25 – Initial football shape removal.
d. Toolpath: Pocket Rough Cribbage EM 0p25 – Cribbage track roughing.
Time: ~15 minutes. Rough cuts completed.

Figure 3: Combined 1/4" toolpaths in single file
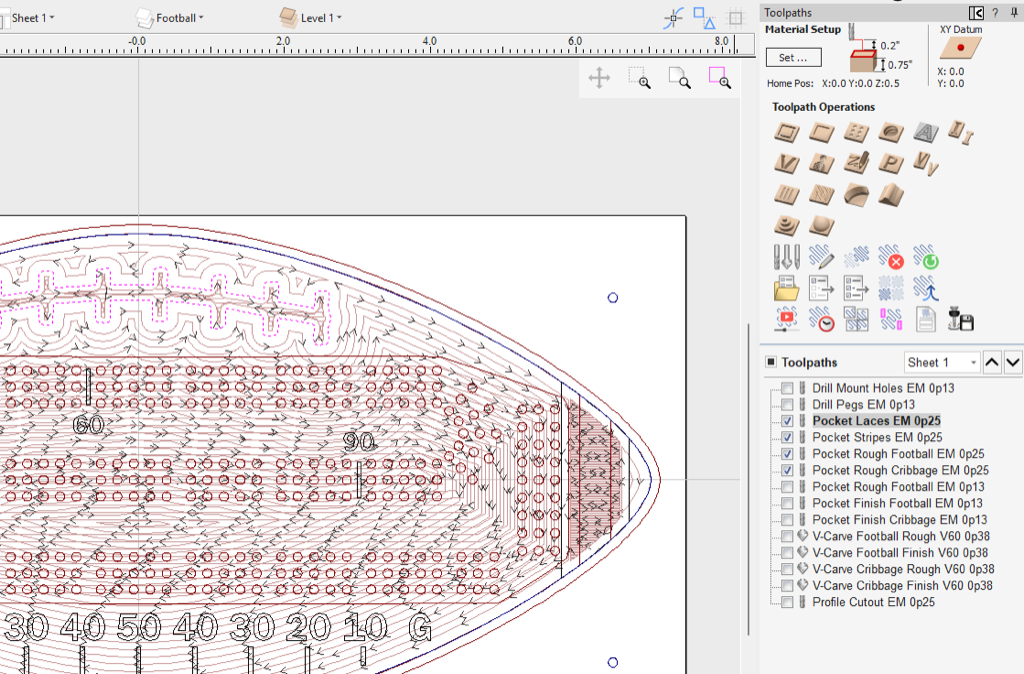
Figure 4: Rough 1/4" toolpaths preview
Fine Detailing with 1/8" End Mill (Step 8)
8. Change to 1/8" end mill and reset Z.
Group these three into one file (see Figure 5). This refines the football and cribbage areas for crisp edges.
a. Toolpath: Pocket Rough Football EM 0p13 – Light cleanup.
b. Toolpath: Pocket Finish Football EM 0p13 – Final pass.
c. Toolpath: Pocket Finish Cribbage EM 0p13 – Cribbage track polish.
Time: ~40 minutes. Finish cuts completed.
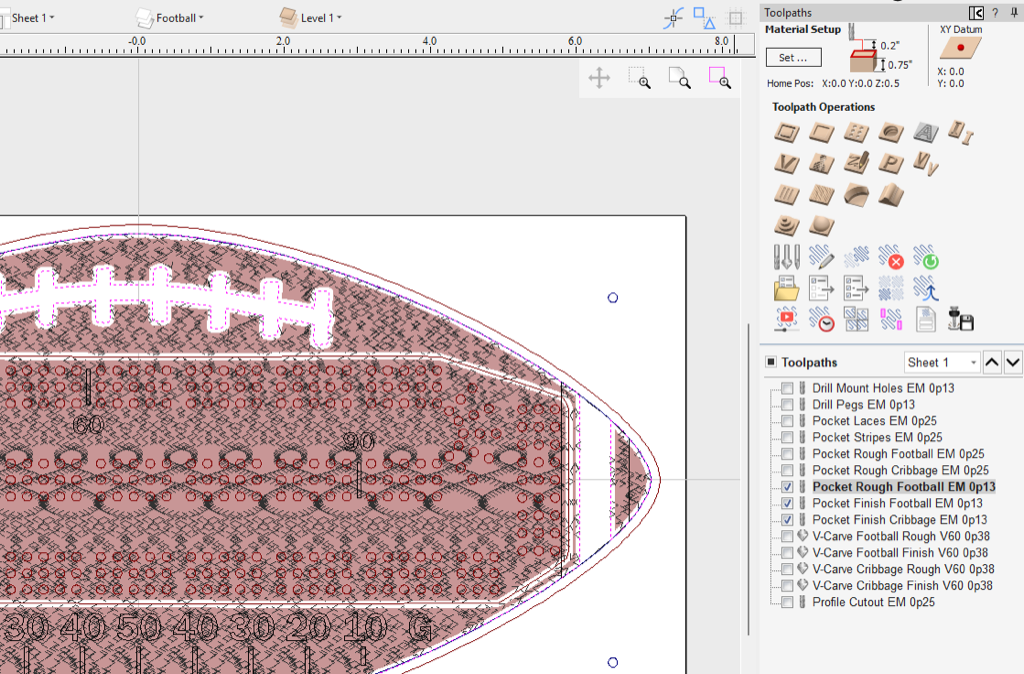
Figure 5: 1/8" toolpaths preview - note the denser toolpath tracks
V-Carving the Football and Cribbage Markers (Step 9)
9. Install 60° x 3/8" V-bit and reset Z.
Four toolpaths, all in one file (see Figure 6). Rough removes bulk; Finish cleans at higher speed.
a. Toolpath: V-Carve Football Rough V60 0p38
b. Toolpath: V-Carve Football Finish V60 0p38
c. Toolpath: V-Carve Cribbage Rough V60 0p38
d. Toolpath: V-Carve Cribbage Finish V60 0p38
Time: ~4 minutes. Grids and markers.
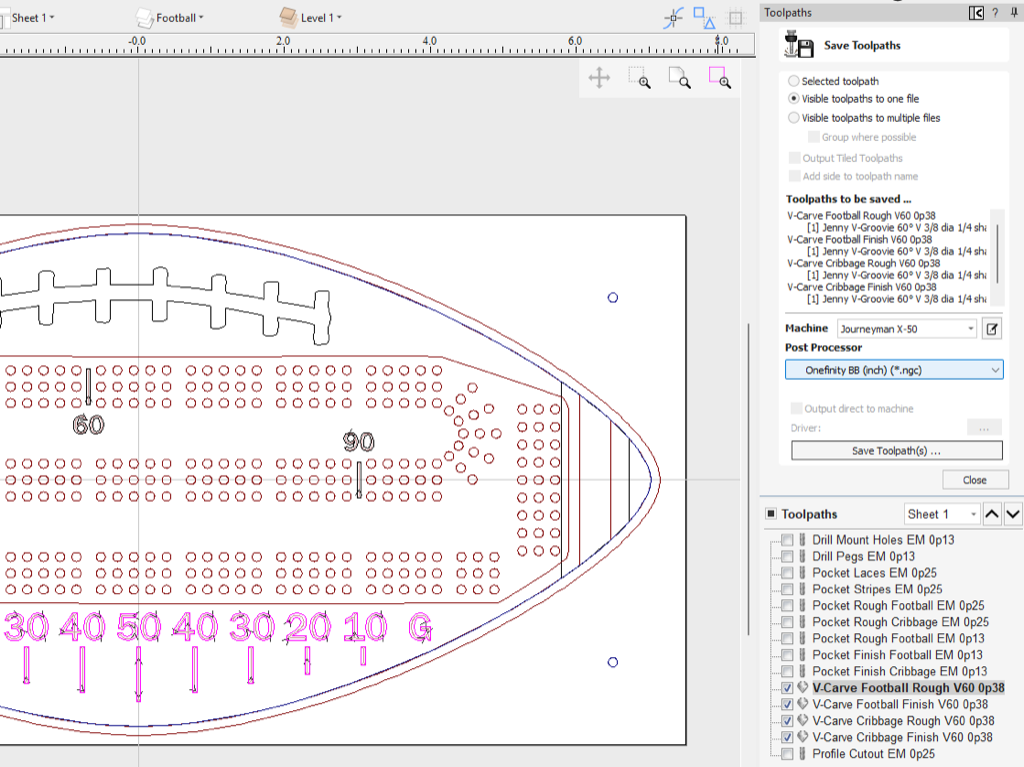
Figure 6: V-carve preview - football and cribbage grid markers
Final Cutout and Finishing (Steps 10–11)
10. Profile cutout with 1/4" end mill.
Reset Z and run the perimeter. If no double-sided tape, add 4–6 tabs (0.125" thick) to this toolpath.
a. Toolpath: Profile Cutout EM 0p25
- 0.75" depth, 120 IPM, tabs optional.
Time: ~3 minutes. Board pops free cleanly.
Total CNC time: ~75 minutes. Ready for sanding and finishing.
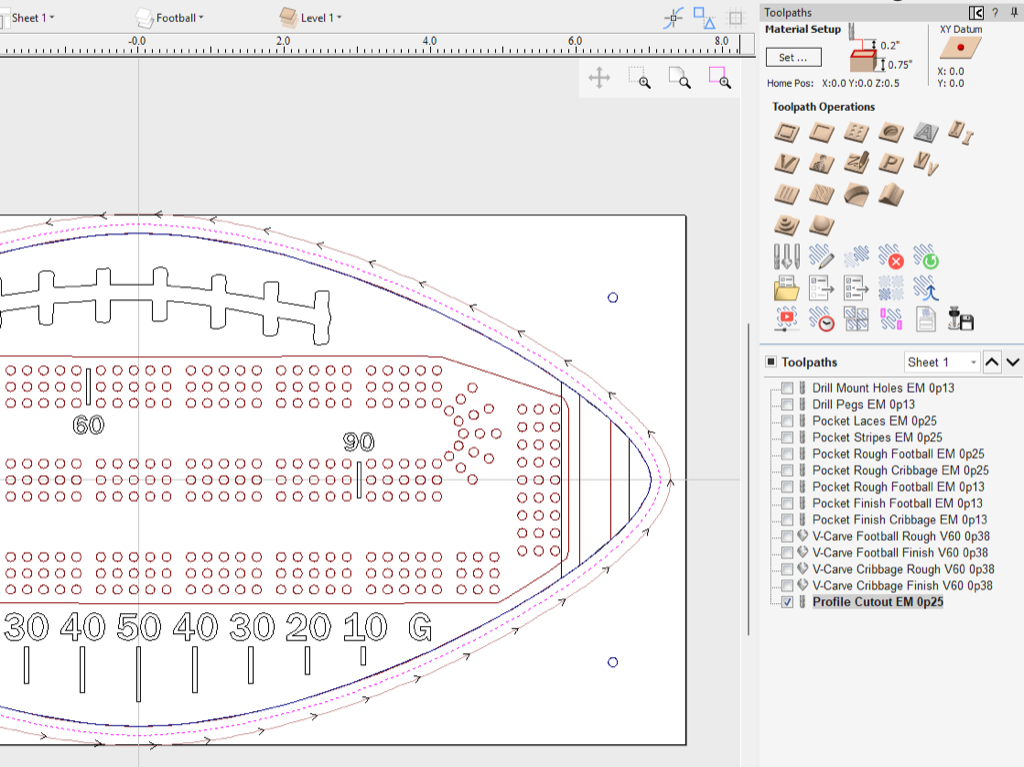
Figure 7: Cutout path
11. Post-CNC finishing.
CNC complete - no interior sanding needed!
a. Sand exterior edges on a belt sander (RIDGID EB4424 or equivalent):
- 120 grit: 5 minutes (remove tool marks).
- 180 grit: 5 minutes (smooth).
- 240 grit: 5 minutes (final polish).
b. Apply 3 - 4 coats of polyurethane, polycrylic, or oil (Tung or Danish).
c. Add cards and pegs and you're game-ready!
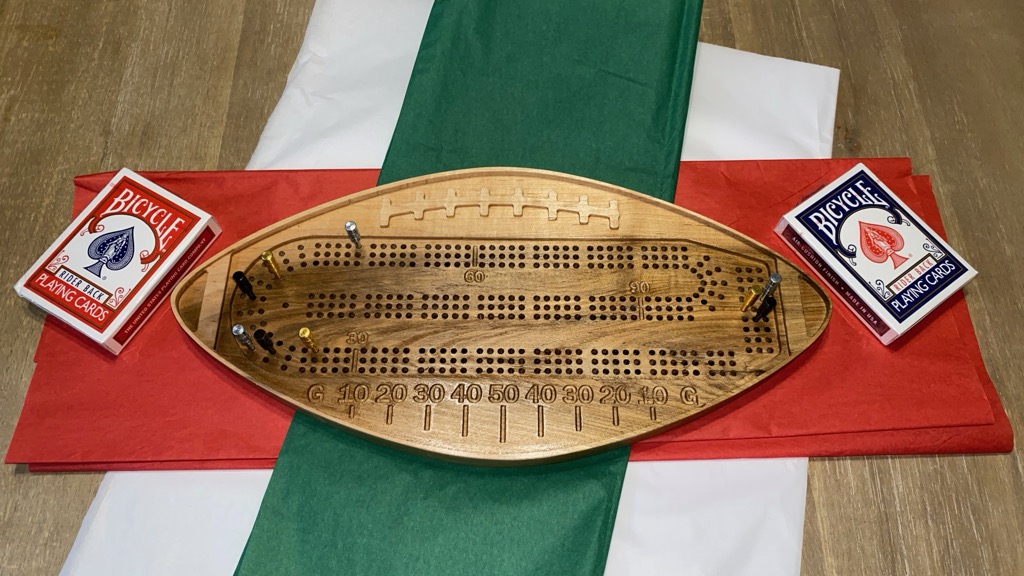
Figure 8: Finished Cribbage board - Minwax Antique Oil Finish
Tips for Success
- Dust collection: Use a good shop vac or dust collector.
- Test run: Always air-cut first or use an inexpensive wood, such as pine or MDF.
- Variations: Replace Laces and/or Football markers with Family or Team names.
- YouTube: Check out the YouTube video of making the 3-up version
- Purchase: Finished cribbage boards or digital files are available for purchase
This cribbage board makes a great gift or fun addition to your game night. Questions? Please use our Contact page. Happy milling!